CtScan
The CtScan module can be used to simulate cone beam CT scans, applying the conventional circular scanning trajectory. The module is accomplished by a Feldkamp reconstruction and volume visualization. The simulated projections can be processed in the same way as experimental CT projections by external reconstruction programs.
Note
It is recommended to use the TIFF file format for easy data exchange, while the internal Feldkamp reconstruction requires projections in BAM CT format.
The CtScan module consists of three separate pages that can be navigated using the tabs at the top of the window - the Setup, the Feldkamp, and the Volume View (Fig. 14). At bottom of module window, you can find a Run button to start or to Stop the simulation and a progress bar. The first two pages offer settings for the scan and for reconstruction (aRTist uses the Feldkamp algorithm for reconstruction). The finished tomogram can be viewed in the scene with the help of the first (Setup) or third (Volume View) tab by clicking on the Show button.
Note
In the Image Viewer the sectional image can be seen selcted by the Slice View in the third (Volume View) tab.
All three pages will be explained in detail below.
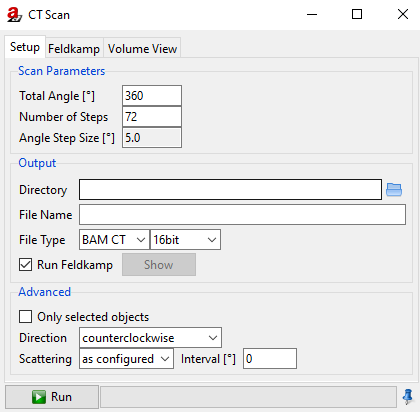
Fig. 14 CtScan: General settings.
Setup
The Setup tab is used to configure the CT (Fig. 14).
Scan Parameters
The adjustable Scan Parameters are Total Angle [°], Number of Steps, and Angle Step Size [°]. The Total Angle [°] is preset to 360°. When setting the Number of Steps, the Angle Step Size [°] is automatically updated and cannot be set by the user.
Output
At the Output choose the Directory and the File Type and set a File Name. The File Type can be chosen between BAM CT or TIFF and 16 bit or float with the two pull-down menus.
Note
If fields are left empty, they will be filled in automatically. For example, the File Name is derived from the current project name.
If you wish to start reconstruction directly after the scan is finished check the corresponding box, Run Feldkamp. You may set the parameters for Feldkamp on the second page. Press the Run button on either one of the three pages when finished with the settings. If you choose not to check the Run Feldkamp box before starting the simulation you may initiate reconstruction manually (see: Feldkamp). Click on the Show button when the simulation is finished to see the tomogram in the scene.
Hint
For an improved view of the reconstruction result deactivate the part or minimize its opacity (Parameter Panel → Setup → Assembly List).
Advanced
By marking Only selected objects you can exclude parts from moving during CT simulation. This means that only the selected objects rotate and the others do not.
Note
To do this, you should select the corresponding components in the Parameter Panel beforehand. Select a single object by clicking on it. Select two or more by holding down the Ctrl key and clicking on the other components to be included in the CT simulation. The components are selected when they are highlighted in blue.
Direction is used to choose between clockwise or counterclockwise direction.
Scattering is used to control the scattered radiation simulation, where “as configured” uses the general settings (Parameter Panel → Scattering) as they are, and “force McRay” overrides the general settings to enable Monte Carlo scatter-simulation.
Interval [°] sets the interval for using the same scatter image (to save computing time by not recalculating the scatter contribution for each projection).
Feldkamp
This tap Feldkamp (Fig. 15) presents the parameters for the CT reconstruction. You may start the reconstruction manually by pressing the Reconstruct button in the lower half of the Feldkamp page. But generally there is no need to start the reconstruction manually as there is the Run Feldkamp check box on the Setup page to start the reconstruction automatically after the necessary data has been acquired.
Options
File name specifies the file in BAM CT format with the projection data to be processed.
Enable or disable Interpolation or/and the Use of GPU, with Use multiple textures or/and Use half precision.
Output
File name will show the path of the output file, which is derived from the path of the projection date file.
You can choose between different File type: BAM CT, VTK, and RAW as 8bit, 16bit, 32bit or float.

Fig. 15 CtScan: Parameters for reconstruction.
Volume View
This tab Volume View (Fig. 16) contains the parameters to control the vizualization of the reconstructed volume. When the Show button is enabled, the reconstructed volume is rendered in the scene view as well as an orthogonal slice of the volume is displayed in the Image Viewer.
File specifies the volume data to read in. Supported file types are: .bd (BAM CT), .raw, .bin, and .vtk.
The following settings for the Volume View are available:
Minimum, Maximum, Level, and Contrast are controls for the opacity of the volume view.
Use 3D texture provides an alternative view mode.
Press the Show button to read in the volume data. This may take a few seconds.
With the Slice View → Show plane option, the slice shown in the image viewer is additionally visualized in the scene. Additional controls are available for selecting the slice to be displayed. Select an axis and move the slider accordingly.
The Positioning controls are used to define the Position of the voxel packet center in the scene and the Spacing (size) of the voxels.
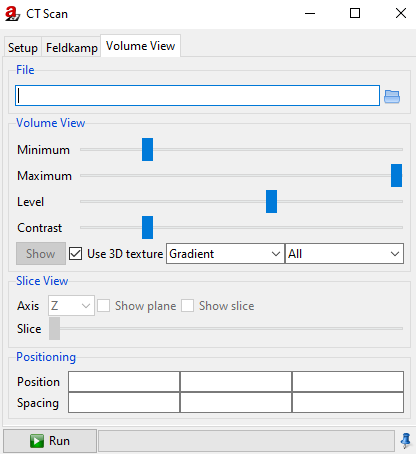
Fig. 16 CtScan: Parameter for volume rendering.